
Total Audio Recorder & Editor
Product Help File
Total Audio Recorder & Editor (also known as Total Audio Editor or TARE) is your go-to audio recording and editing software, packed with an array of versatile features. With TARE, you can effortlessly record audio, fine-tune your recordings, mix multiple soundtracks, and easily share your audio creations.
This user-friendly product guide is here to guide you through the essentials, ensuring you feel at home using the software in no time. Each topic is a quick read and the handy table of contents on the right makes navigation a breeze.
Within each section, you’ll find step-by-step instructions for specific tasks, along with helpful visuals to ensure you’re on the right track. Let’s dive in and get creative with your audio projects!
– Sponsored Links –
To launch Total Audio Editor
The main window of the application encompasses all the key features that you’ll become acquainted with in the course of this guide.
Before you start recording your audio, ensure that your input device (e.g., microphone) and output device (e.g., speakers or headset) are appropriately connected and configured. The recommended setting for Project Sample Rate is 44100 Hz.
Preparation for Recording:
Before commencing your recording session, ensure that your input device (e.g., microphone) and output device (e.g., speakers or headset) are securely connected and properly configured. It’s recommended to maintain a Project Sample Rate of 44100 Hz for optimal audio quality.
Starting the Recording:
Getting into the recording mode is straightforward:
1. Locate and click the Record button on the Control Toolbar.
2. Initiate your input stream or begin speaking into the microphone to capture voice recordings.
3. Manage recording pauses using the Pause button—pressing it halts recording, while pressing it again resumes the process.
4. When your recording is complete, finalize the process by pressing the Stop button.
Visualizing Your Recording:
Upon completion, the results of your recording process manifest as a waveform representation. This visual depiction, displayed within the newly established Audio Track, offers a clear and concise representation of your audio content. This representation acts as a foundation for your subsequent steps in the editing journey.
– Sponsored Links –
Importing Audio into Your Project:
Total Audio Editor offers native support for a range of audio file formats including AIFF, AU, FLAC, MP2, MP3, OGC Vorbis, and WAV.
Importing to an Existing Project:
To seamlessly bring an audio file into your ongoing project, you have two options:
– Navigate to File > Import > Audio in the menu, or
– Simply drag and drop the desired audio files into the current project window.
Once the import process concludes, the newly integrated sound track will emerge, prominently displayed within the Work Area, ready for your creative touch.
Importing to a New Project:
If you’re starting fresh and want to import a file to a new project, opt for the File > Open command.
Total Audio Editor’s versatility is evident as it effortlessly accommodates commonplace formats such as AIFF, AU, FLAC, MP2, MP3, OGG Vorbis, and WAV.
Beyond the Basics: Enhanced Capabilities:
Delving deeper into its capabilities, Total Audio Editor leverages the optional FFmpeg library. This integration elevates the software’s prowess by enabling audio extraction from video files, opening the door to a broader array of file formats that you can work with.
– Sponsored Links –
Assessing Audio Quality and Playback:
To ensure the audio quality meets your expectations, take advantage of the playback feature. To listen to your imported audio or recording, simply click the Play button located on the Control Toolbar. If you need to pause or stop playback, the Pause or Stop button is at your disposal.
Adjusting Playback Settings:
Fine-tuning the playback experience is seamless. Utilize the Playback Volume slider on the Mixer Toolbar to set the desired volume for playback. Additionally, the Playback Speed slider offers control over the playback speed, allowing you to navigate through the audio content at your own pace.
Convenient Playback Controls:
For quick and convenient control, the Space bar can be employed to initiate playback or halt it instantly. If you’re looking to start playback from a specific point, clicking on the track at that position and using the Space bar to initiate playback from there is an effective method.
Efficient Navigation:
Navigating through your audio content is made efficient through the Skip to Start |< or Skip to End >| button. Clicking these buttons allows you to swiftly jump to either the beginning or the end of the track, streamlining your editing process.
– Sponsored Links –
– Sponsored Links –
Should you discover that your recording level is either too faint or too pronounced, it’s pivotal to fine-tune the recording volume prior to embarking on the editing process to ensure optimal quality.
To tailor the recording volume to your preference, simply manipulate the Recording Volume slider featured within the Mixer Toolbar. This straightforward adjustment empowers you to amplify or attenuate the recording volume as needed.
For vocal recordings, if you encounter a situation where the volume is too low, consider positioning yourself closer to the microphone to achieve a clearer capture.
In scenarios where the recorded sound level remains unsatisfactory even after adjusting the Recording Volume within Total Audio Editor, you can explore increasing the microphone volume within the Windows environment:
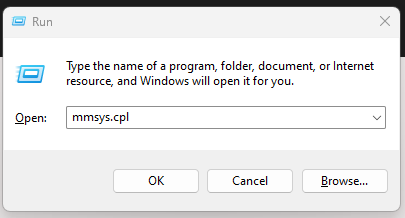
1. Initiate the Sound dialog box by pressing Windows + R to launch the Run dialog box. Then, input “mmsys.cpl” and press Enter.
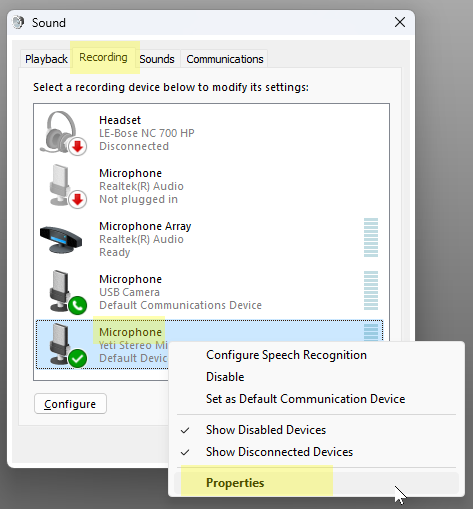
2. Click on the Recording tab, identify and select the active microphone, then opt for Properties.
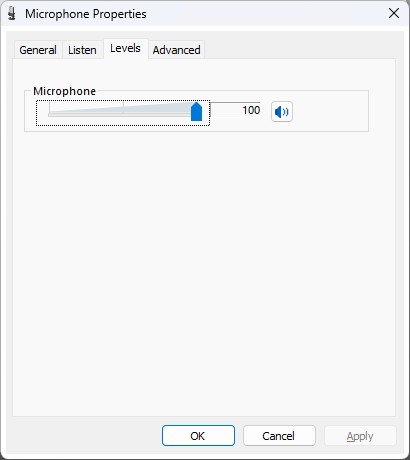
3. Within the Microphone Properties dialog box, navigate to the Levels tab. Here, you can fine-tune the recording volume by adjusting the Microphone Boost slider, granting you the ability to amplify the recording volume as needed.
Removing a Section of an Audio Track:
To delete a specific segment from an audio track, follow these steps:
1. Click on the Selection Tool in the toolbar.
2. Click and hold the mouse button while dragging to select the portion of audio you intend to remove. This selection will be visually marked.
3. Either choose Edit > Delete from the menu or press the Delete key to eliminate the selected portion.
If you prefer to keep the neighboring sound track or label unaffected, opt for Edit > Remove Special > Split Cut or Split Delete. These commands create a gap between the selection and the remaining content.
Deleting an Entire Audio Track:
For removing an entire audio track, proceed as follows:
1. Locate the X button positioned at the top-left corner of the track.
2. Give it a click, and the track will be completely removed from the current project.
Alternatively, you can choose Tracks > Remove Tracks to efficiently eliminate the currently active sound track. This streamlined process ensures your editing workspace remains neat and focused.
– Sponsored Links –
Introducing a Second Audio Track:
Expanding the creative scope of your recording is simple—introduce a second audio track, such as a background soundtrack, to complement your existing recording. Here’s how:
1. Utilize the File > Audio > Import method, as outlined in the Import Audio section, to effortlessly include the additional sound track.
2. Upon incorporation, the newly added audio track will align parallel to the first sound track, offering an organized canvas for your creative endeavors.
Leveraging Blank Tracks:
There are instances where cutting and pasting audio data from an existing track becomes essential. In such scenarios, the inclusion of a blank track proves invaluable. To create a pristine track, you have two options: adding a Mono track or a stereo track.
1. Initiate the process by clicking on Tracks > Add New.
2. Make your choice between a Mono track or a stereo track based on your requirements.
Enhancing Tracks with Labels:
Adding a layer of clarity to your tracks is a breeze with text labels. Here’s how:
1. Navigate to the Track Control Panel situated in the top-left section of the track.
2. Click on the dropdown button, then select Name…
3. Enter the desired label to be applied. This label enhances the organization and accessibility of your audio tracks.
Aligning Tracks in Harmony:
Managing multiple audio tracks becomes seamless when you wish to synchronize the start or end of one track with another.
1. Opt for the Time Shift Tool to facilitate this alignment.
2. Simply select the audio track you intend to shift and, through dragging, execute the necessary adjustment.
Fine-Tuning with Playback:
To ensure your adjustments are on point, take advantage of the playback function:
– Play back your adjusted track to test and refine its alignment, ensuring it yields the desired output.
Effortless Track Relocation:
The process extends to relocating selected audio clips across tracks of the same type:
– When dealing with mono audio clips, smoothly move them to mono tracks; likewise, for stereo clips to stereo tracks.
Vertical Control with Precision:
For meticulous control, utilize the Ctrl key as you drag:
– Press and hold Ctrl to allow vertical movement only. This refined control empowers you to navigate the track positioning with precision.
– Sponsored Links –
Individual Track Volume Control:
Tailoring the volume of each audio track according to your preferences is at your fingertips. Picture this: you want to soften the background music while elevating the prominence of your voice track.
Precise Volume Customization: Envelope Tool:
For granular control over specific segments of an audio track, the Envelope Tool steps in:
Safeguarding your creative endeavors is paramount, and Total Audio Editor makes it effortless to preserve your work by saving it as a project. A project encapsulates all vital information, from audio tracks and raw audio data to volume settings, positions, and sound effects.
To ensure your efforts are secure and accessible, follow these simple steps to save your project:
When it’s time to share or publish your audio project with others, the pivotal step is exporting it. Total Audio Editor provides a seamless process to export your work in the most common audio file formats: WAV or MP3.
To export your project and prepare it for sharing, follow these straightforward steps:
Instructions:
Choosing Between Formats:
– Sponsored Links –
LISAppStudio
Everyday apps made simple
Tech talk made for non-techies